
The simplest way to check your Node.js version is with a quick terminal command: node -v. Done. But knowing why you're running that command, and what to do with the answer, is what really matters.
Why Your Node Version Is a Bigger Deal Than You Think

Before we get into the different ways to check your version, let’s talk about why this isn't just a trivial command. A mismatched Node.js version is the silent killer behind a ton of deployment failures, security holes, and the classic "it works on my machine" headache. This isn't just about running a command; it's about building a solid foundation for your work.
The Real-World Impact of Version Mismatches
I've seen it happen more times than I can count. A team kicks off a new project, eager to use a slick new JavaScript feature like top-level await. But then one developer is still running an old, unsupported Node version. Their code immediately crashes. Hours are wasted debugging something that a simple version check would have caught in seconds.
This chaos isn't limited to your local setup. Pushing code to a production server with the wrong Node version can make the whole build fall over. Even worse, it can introduce sneaky runtime bugs that only show up under pressure.
As a developer, keeping your environments consistent is everything. That quick version check is your first line of defense against compatibility bugs, deployment disasters, and security flaws that can completely derail a project.
Security and Compatibility Are Non-Negotiable
Your Node.js version is directly tied to your application's security. When a version reaches its End-of-Life (EOL)—like Node.js 18 did—it stops getting security patches. That means your app is a sitting duck for known vulnerabilities. Running old, unmaintained versions is a risk you just can't afford to take.
On top of that, the entire npm ecosystem is built on versioning. Package maintainers explicitly state which Node versions their code is built for. If you ignore those requirements, you're asking for broken dependencies and npm install failures.
Ultimately, a stable and predictable environment is a core reason why mastering a node js version check is so critical. As you'll find in our other guides for developers, getting the fundamentals right saves you from countless headaches down the road.
Quickest Ways to Perform a Node JS Version Check
When you're knee-deep in a project, you don't have time to mess around. You just need to know which version of Node.js you’re running, and you need to know now. Luckily, the fastest way is right at your fingertips in the command line.
The most common, go-to command that every Node developer has burned into their muscle memory is node -v. It’s short, sweet, and gets the job done instantly.
You can also use the more descriptive version, node --version. Honestly, there’s no functional difference—both hit the same target. Which one you use comes down to personal habit. Either way, your terminal will spit back the version number currently active in your path, something like v20.11.1. This works universally, whether you're on a Mac, Linux, or a Windows machine using PowerShell or WSL.
Essential Commands for Instant Version Checks
For a quick reference, here are the two commands you'll use constantly. They're your first line of defense when debugging an environment issue or starting a new project.
| Command | Alias | Typical Output | Best Use Case |
|---|---|---|---|
node -v |
node --version |
v20.11.1 |
My personal favorite. It's the quickest way to get a sanity check. |
node --version |
node -v |
v20.11.1 |
Great for scripts or documentation where clarity trumps brevity. |
While they look simple, these commands are incredibly powerful for a quick diagnostic.
A crucial thing to remember: These commands only tell you about the Node.js version your current terminal session sees. If you're using a version manager like NVM, the output will reflect whichever version you’ve activated with a command like
nvm use 20.
For 99% of your daily checks, node -v is all you'll ever need. It’s a simple reflex that can save you from a world of pain caused by version mismatches.
Managing Multiple Node Versions Like a Pro
If you’ve been a developer for any length of time, you know the pain of juggling projects. One project needs a stable LTS release, while that legacy app you inherited is stuck on an older version of Node.js. Manually uninstalling and reinstalling Node every time you switch projects isn't just a hassle—it's a recipe for disaster.
This is exactly why a Node Version Manager (NVM) is a non-negotiable part of my toolkit, and it should be for you too. These tools let you install and switch between different Node.js versions on the fly with a single command, keeping each project's environment completely separate.
Getting Started with NVM
Once you have NVM installed, managing versions becomes second nature. Honestly, you'll probably only use a handful of commands day-to-day.
nvm install <version>: This is how you grab a new version. You can get super specific withnvm install 20.11.1, or just pull down the latest stable release withnvm install --lts. The LTS version is almost always what you want for production-ready apps.nvm ls: Forgot what you have installed? Just run this command. It gives you a clean list of all your Node versions and highlights which one is currently active in your shell.nvm use <version>: This is where the magic happens. Need to work on that old project that requires Node 18? A quicknvm use 18in your terminal, and you're all set. Your entire shell session now runs on that specific version.
Automating Version Switching with `.nvmrc`
Manually switching is easy enough, but we're developers—we automate things. You can create a file named .nvmrc right in your project's root directory. Inside that file, you just add a single line with the version number, like v20.11.1.
Now, whenever you navigate into that project folder, you can just run nvm use. NVM is smart enough to find the .nvmrc file and automatically switch to the correct version for you.
I can't stress this enough: commit the
.nvmrcfile to your Git repository. It ensures every developer on the team—and just as importantly, your CI/CD pipeline—is on the exact same page. This one tiny file can eliminate a huge class of "it works on my machine" bugs.
Exploring Other Version Managers
While NVM is the undisputed king for macOS and Linux, it's not the only game in town. Depending on your workflow or operating system, you might find another tool fits you better.
A few popular alternatives include:
- n: A really simple and lightweight version manager that's praised for its straightforward syntax.
- Volta: A more modern, "set it and forget it" tool that automatically switches Node and package manager (like npm or Yarn) versions based on what's in your
package.json. - asdf: This one is a multi-language version manager. If you also work with Ruby, Python, or Elixir,
asdflets you manage all their versions from one place with a consistent set of commands.
Ultimately, they all solve the same core problem. The important thing is to pick one and use it to perform a proper node js version check and make environment management a solved problem.
Version Checks in Production and CI/CD Pipelines
Checking your Node.js version on your local machine is one thing, but the real test comes when you push your code to production. In automated environments like CI/CD pipelines, a surprise version mismatch isn't just an annoyance—it can halt a deployment or, even worse, bring down your entire application.
This is where you need to move beyond manual checks and build version awareness directly into your workflow.
Checking the Version from Inside Your App
Ever needed to know the exact Node version an application is running on for debugging? Node.js gives you a simple, programmatic way to find out.
Just access the process.version property from anywhere in your code. It returns a string with the precise version, like 'v20.11.1'. This is incredibly handy for logging environment details on startup or even creating runtime checks that prevent the app from starting if the environment is wrong.
The Best Defense: Enforce Your Version in `package.json`
The most effective way to prevent version-related headaches is to declare your project's required Node.js version right in the package.json file. The engines field is your best friend here. It acts as a bouncer, telling package managers like npm or Yarn which versions are allowed in.
For example, if your project depends on features found only in Node.js 20 or newer, you’d add this to your package.json:
"engines": {
"node": ">=20.0.0"
}
With this in place, if another developer (or a build server) tries to run npm install with an older, unsupported version, npm will immediately throw an error and stop. It’s a simple, powerful way to enforce consistency across a team and in your automated builds.
Deciding when to use a project-specific version file versus a globally switched version is a common crossroads for developers. This flowchart breaks down that decision, especially when using a version manager like nvm.
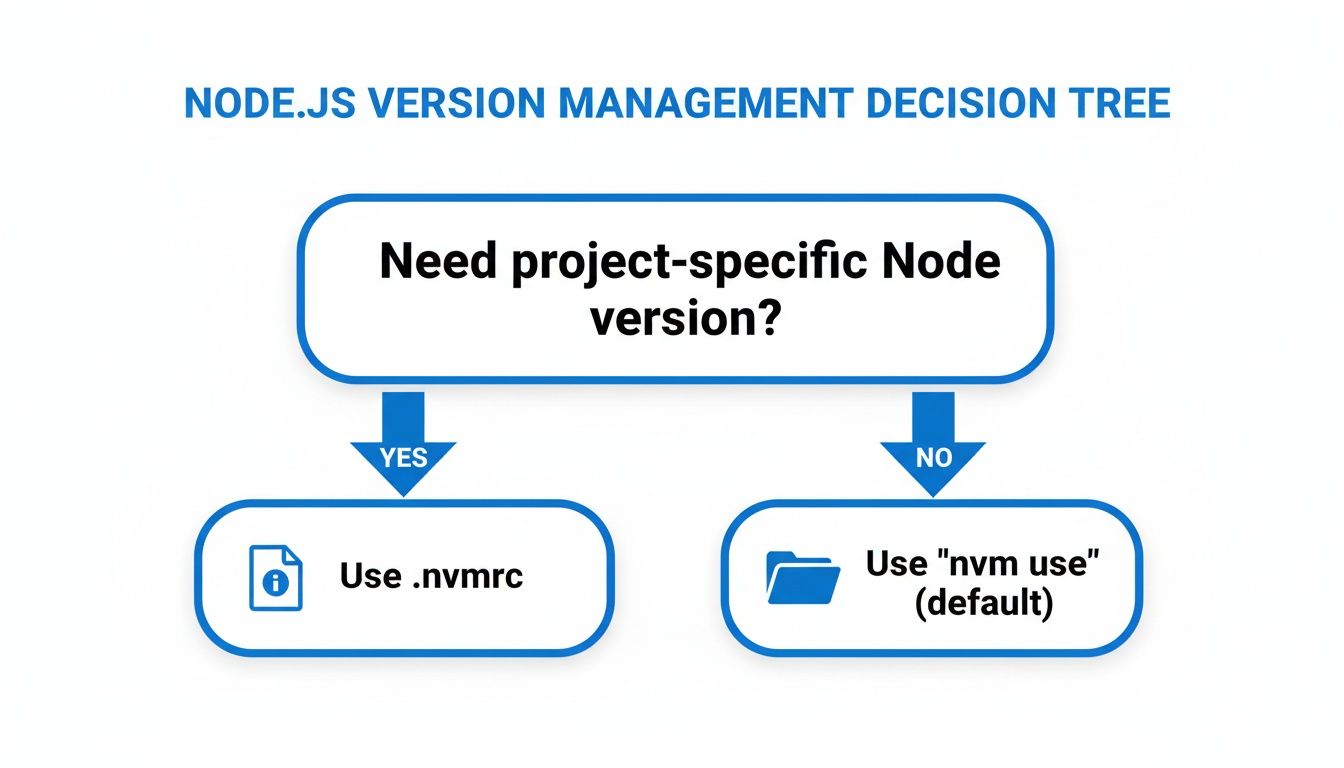
As you can see, for any project you share with a team, creating a local .nvmrc file is the way to go. It ensures everyone is on the same page from the moment they clone the repo.
Versioning in CI and Docker
This same principle of being explicit extends directly to your deployment environments.
In a CI/CD pipeline, like with GitHub Actions, you should always specify the exact Node.js version for the build agent. This guarantees your code is tested and built in a predictable environment every single time. No more "it worked on my machine" mysteries.
It's even more critical in containerized applications. When writing a Dockerfile, resist the temptation to use a vague tag like FROM node:latest. That's a recipe for future pain. Instead, lock it down to a specific version:
FROM node:20-alpine
This ensures your containerized app runs on the exact same Node.js version today, tomorrow, and a year from now.
By hardcoding your Node.js version in
package.json, CI configurations, and yourDockerfile, you turn version checking from a manual chore into an automated, reliable safeguard. You’re no longer hoping for consistency; you’re enforcing it.
Mastering your Node.js version is a fundamental skill, especially for developers deploying prototypes or static sites where compatibility is key. Since its launch in 2009, Node.js has exploded in popularity, surpassing one billion downloads by 2018. That scale makes version management an absolute necessity for building stable applications, particularly when using platforms that offer free static site hosting, where the wrong Node version can easily break a deployment. You can read more on Node's incredible growth and what it means for developers.
Solving Common Node Versioning Headaches
Even with the best tools, Node.js version issues can still sneak up on you, turning a productive day into a frustrating debugging session. Most of these problems come down to small, tricky inconsistencies in your development environment. The good news is, once you know what to look for, the fixes are usually pretty simple.
Let's start with a classic: you install Node, run node -v, and get hit with command not found. This almost always means your system's PATH variable is the culprit. Your terminal simply doesn't know where to find the Node executable. You'll need to make sure your PATH includes Node’s bin directory so the command can be found from anywhere.
Another all-too-common scenario is when you pull down a legacy project. You run npm install and are greeted by a wall of red error text. This usually happens because a critical dependency needs an older, specific version of Node.js to work. This is exactly why a version manager is a lifesaver—you can just run a command like nvm use 16 to switch to the right version and get things working without messing up your main setup.
Fixing Dependency Conflicts
Have you ever switched your Node version for one project, then gone back to another only to find it's completely broken? This often happens because some packages compile native addons that are tied to the exact Node version they were installed with.
When you find yourself in this situation, a couple of commands are your best friends:
npm rebuild: This is your first stop. It tries to re-compile your existing dependencies against the version of Node you just activated.rm -rf node_modules && npm install: If rebuilding doesn't cut it, it's time for the nuke-and-pave approach. This completely wipes out the old modules and gives you a fresh install, ensuring everything is built correctly for your current environment.
Sometimes, the problem is more stubborn. If a fresh install still fails, you might be dealing with a corrupted npm cache. In those cases, learning how to clear the npm cache can be the magic bullet that finally gets your dependencies installed correctly.
Understanding these common pitfalls makes it much easier to diagnose and fix most version-related headaches. To prevent these issues from happening in the first place, get in the habit of using the engines field in your package.json. It's a fantastic proactive step that keeps your whole team on the same page and your development workflow running smoothly.
Got Questions? We’ve Got Answers.
When you're juggling different Node.js projects, a few common questions always seem to pop up about managing versions. Let's tackle them head-on.
How Do I Update Node.js to the Latest Version?
The safest and most flexible way is to use a version manager. If you have NVM installed, it's as simple as one command.
To grab the absolute newest release with all the latest features, run:
nvm install node
For production environments, though, you’ll almost always want the latest Long-Term Support (LTS) version. It’s the stable, reliable choice. Get it with:
nvm install --lts
What’s the Difference Between LTS and Current?
Think of it like this: LTS (Long-Term Support) is your rock-solid, production-ready workhorse. These versions are all about stability, security, and predictability. They get critical bug fixes and security patches for an extended period, which is exactly what you want for live applications.
On the other hand, the Current version is the cutting edge. It’s where all the new, exciting features land first. It’s perfect for experimenting and testing out the future of Node.js, but it might have a few rough edges or introduce breaking changes. Stick to LTS for anything that needs to be reliable.
Can I Have Multiple Node.js Versions Installed at Once?
Absolutely! In fact, it's pretty much standard practice for any serious Node.js developer.
Tools like NVM are built for this exact scenario. They let you install as many versions as you need side-by-side without them interfering with each other. When you need to switch from a legacy project running on Node.js 18 to a new one on Node.js 20, it's just one command away: nvm use 20. It makes managing project-specific requirements a breeze.
With Hostmora, you can turn your Node.js project exports into live websites in seconds. Go from a ZIP file to a globally-deployed site instantly. Learn more at Hostmora.