
When you need to send a user to a new page using JavaScript, you're essentially performing a redirect right inside their browser. This is what's known as a client-side forward, and it's surprisingly simple. Often, it just takes a single line of code, like window.location.href = 'https://new-page.com', to get the job done.
This approach lets you steer visitors to a new URL dynamically based on their actions, all without ever touching the server.
Understanding Client-Side URL Forwarding
So, what makes a client-side forward different? It all comes down to when the redirect happens. A server-side redirect intercepts the request before a page even starts to load. But a JavaScript forward kicks in after the browser has already received the initial HTML and JavaScript.
This might seem like a small detail, but it’s a game-changer. It opens up all sorts of possibilities for dynamic, user-driven navigation that just aren't practical from the server.
Think of it this way: a server-side redirect is like the post office permanently forwarding all your mail to a new address. A client-side redirect is like leaving a note on your old front door telling visitors where you've gone. The original location is still reached first.
Common Scenarios for JavaScript Redirects
Because these redirects are triggered by logic running in the browser, they're perfect for situations that depend on user input or what's happening on the page. I've found myself reaching for this technique in countless real-world scenarios:
- After Form Submissions: Once someone hits "submit" on a contact form or completes a checkout, you can instantly whisk them away to a "Thank You" page.
- Conditional Routing: You can get creative here. Detect a user's device, browser language, or even location and send them to a version of the site that's a better fit for them.
- Login and Authentication: This is a classic. A user logs in successfully? Send them straight to their account dashboard. Their session expires? Redirect them back to the login screen.
- Single-Page Applications (SPAs): Modern frameworks like React or Vue.js lean heavily on JavaScript to handle routing, changing the URL and page content without a full, jarring page refresh. It makes a website feel more like a native app.
The ability to programmatically control navigation is fundamental to web development. It allows developers to build responsive, interactive user journeys that react to events in real time, making websites feel more like applications.
This isn't some new-fangled trick; it's a core part of how the web works. The power to manipulate the browser's location was one of JavaScript's earliest features, dating all the way back to its creation in 1995. Today, that simple mechanism is used on an incredible 98.9% of all websites. You can explore more about JavaScript's widespread use to see just how foundational this capability really is.
Getting to Grips With JavaScript's Core Redirect Methods
When you need to send a user to a new page using JavaScript, you have a handful of go-to methods. Each one behaves a little differently, especially when it comes to the browser's history, so picking the right one is crucial for a smooth user experience. Let's walk through the tools you'll be using most.
The Standard Redirect: `location.href` and `location.assign()`
The most straightforward way to forward a URL is by changing the window.location.href property. Think of href as the current address in the browser's address bar. When you assign a new URL to it, the browser immediately starts loading that new page. It’s simple, direct, and universally supported.
// A straightforward redirect to a new page window.location.href = 'https://hostmora.com/features';
You'll also run into window.location.assign(). In practice, it does the exact same thing as setting href. Both methods load the new URL and, importantly, add it to the browser's session history. This means the user can hit the "Back" button to return to the page they just left. For most everyday redirects, either one will do the job perfectly.
Controlling Browser History With `location.replace()`
Now, what if you don't want the user to be able to go back? This is a common requirement for pages that handle a one-time action, like a login form or a payment gateway. If a user logs in and then hits "Back," you don't want them landing on the login screen again while they're already authenticated.
This is exactly what window.location.replace() is for.
It sends the user to the new URL but replaces the current page in the browser's history. The page they were on is effectively scrubbed from the session's "Back" stack. If they try to go back, they'll skip right over it to whatever page they were on before.
My two cents: I always reach for
location.replace()after a user completes an action like submitting a form, logging in, or finishing a checkout process. It prevents all sorts of headaches, like accidental double submissions or weird state issues when a user navigates backward.
Imagine a user signs up for your newsletter. After they submit, you can redirect them to a "thank you" page and make sure they can't accidentally go back and resubmit the form.
// After a successful form submission, this code runs. // The user won't be able to navigate back to the form page. window.location.replace('https://yoursite.com/thank-you');
This decision tree gives a great visual for when a client-side JavaScript redirect makes sense versus a server-side one.
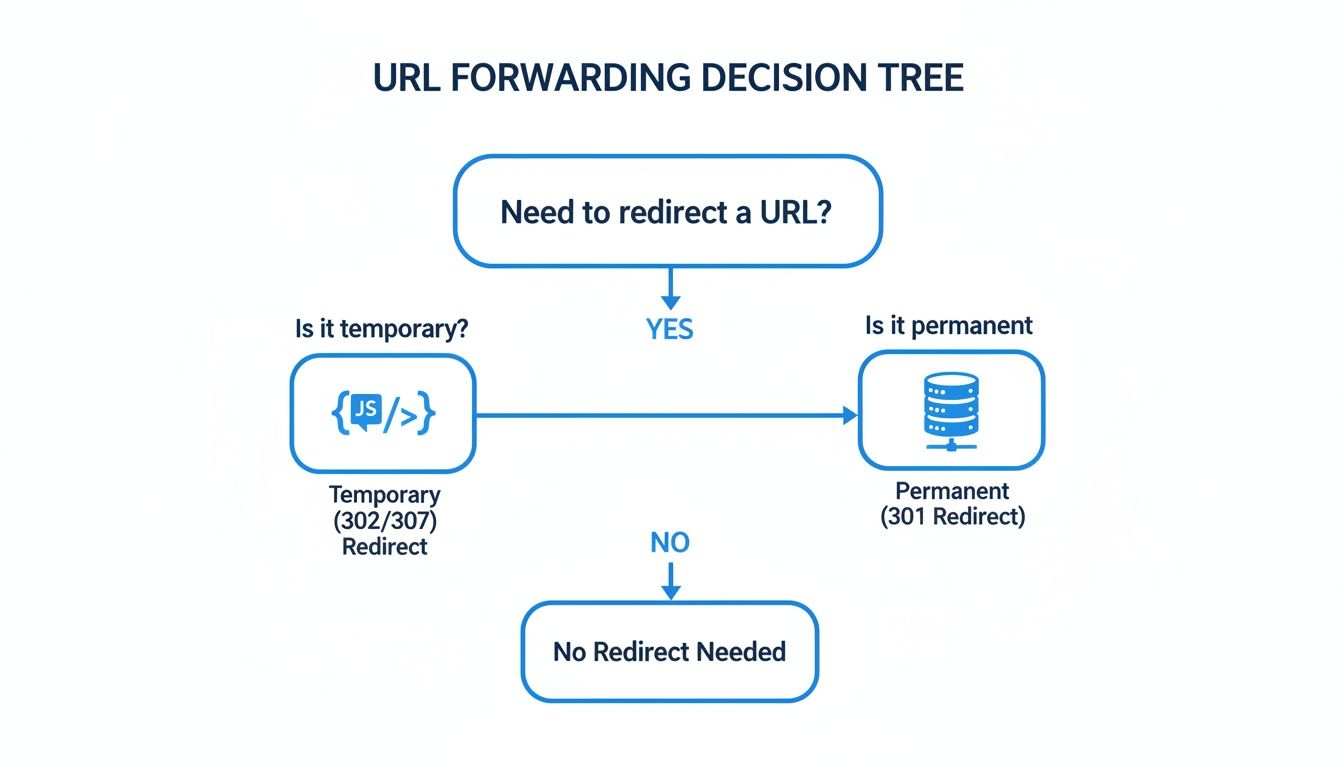
As the chart shows, JavaScript is perfect for temporary or conditional redirects based on user actions. Permanent moves are best handled on the server with a 301 redirect to preserve your SEO value.
Popping Open URLs in a New Tab
Redirecting isn't always about changing the current page. Sometimes you just need to open an external link in a fresh tab. For that, window.open() is your function.
To get a new tab to open, you'll pass _blank as the second argument.
// Opens the target URL in a new browser tab window.open('https://hostmora.com', '_blank');
But a quick word of warning: when opening external links this way, you should always add rel="noopener noreferrer". This is a crucial security step that prevents the newly opened page from potentially hijacking your original page through the window.opener property.
Here's the safer, more modern approach:
const newWindow = window.open('https://some-external-site.com', '_blank'); if (newWindow) { newWindow.opener = null; }
This little addition ensures the link is opened safely without creating a security vulnerability.
Comparison of JavaScript Forwarding Methods
To make it even clearer, here’s a quick side-by-side comparison of the methods we've just covered. This table should help you decide which one to grab for your specific situation.
| Method | Description | Effect on Browser History | Best Used For |
|---|---|---|---|
location.href |
Assigns a new URL to the window's location, causing the browser to navigate. | Adds new page to history. | General-purpose redirects where going "Back" is okay. |
location.assign() |
A method that loads a new document. Functionally identical to setting href. |
Adds new page to history. | Interchangeable with location.href. |
location.replace() |
Replaces the current document with a new one. | Overwrites current page in history. | Redirects after logins, form submissions, or one-time actions. |
window.open() |
Opens a specified URL in a new browser window or tab. | Does not affect the current page's history. | Opening external links or supplementary content in a new tab. |
With these fundamental methods in your toolkit, you're well-equipped to manage user navigation flows cleanly and securely. Choosing the right one is simply a matter of understanding your goal and how you want to impact the user's browser history.
Advanced Forwarding Techniques for Modern Apps

While location.href works perfectly for simple page jumps, modern web applications need to feel more fluid and responsive. The jarring full-page reload is a thing of the past. This is where the History API steps in, giving you the power to manipulate the browser's URL and session history without that disruptive refresh. It’s the magic behind today’s Single Page Applications (SPAs).
Instead of fetching a whole new HTML document, the History API lets you update the URL in the address bar while dynamically swapping out content on the page with JavaScript. The result is a seamless transition that feels instant to the user.
Navigating Without Page Reloads
The two methods you'll lean on most are history.pushState() and history.replaceState(). They both change the URL, but they interact with the browser's history in critically different ways.
history.pushState(): Think of this as adding a new "page" to the browser's memory. It creates a new entry in the history stack, so when a user clicks the "Back" button, they land on the previous state you pushed. This is ideal for moving between distinct views in an SPA.history.replaceState(): This one behaves more likelocation.replace(). Instead of adding a new entry, it modifies the current one. It's incredibly useful for updating the URL with things like filter parameters or state changes that shouldn't clog up the user's "back" button history.
Here’s a practical example of using pushState to load a user’s profile without a refresh:
// This function would fetch and display the new profile content
function loadUserProfile(userId) {
const state = { userId: userId };
const title = Profile of User ${userId};
const url = /users/${userId};
// Change the URL and add a new entry to the browser's history history.pushState(state, title, url);
// Now, fetch and render the content for this new "page"
renderProfileContent(userId);
}
This simple snippet changes the browser's URL to /users/123 and updates the page content, all without a single traditional network request for a new HTML file.
Frameworks and Modern Routing Abstractions
Let's be honest, managing history states manually can get messy fast. That’s why popular frameworks like React and Vue have dedicated routing libraries (like React Router and Vue Router) that handle all this complex logic for you. They provide simple, declarative components that make defining routes and managing navigation a much smoother experience.
For instance, in a React app using React Router, triggering a navigation is as clean as calling a hook:
import { useNavigate } from 'react-router-dom';
function UserProfileButton() { const navigate = useNavigate();
return ( <button onClick={() => navigate('/dashboard')}> Go to Dashboard ); }
This neatly abstracts away the low-level details of the History API, letting you focus on what your application actually does.
Modern routing is about more than just changing the URL. It's about creating a stateful, responsive user experience that mirrors the fluidity of a native desktop or mobile application.
For developers building from scratch or working on performance-sensitive applications, another powerful tool has emerged. The URLPattern API, which stabilized in 2023, offers a native, high-performance way to match and parse URLs without bulky external libraries or tricky regular expressions. It can slash boilerplate code by up to 50% and is a game-changer for apps running on edge platforms like Cloudflare Workers.
This is especially true for projects that take advantage of free static site hosting, where every millisecond and kilobyte of JavaScript matters. You can read more about these underrated JavaScript APIs and how they're shaping modern development.
SEO and Security Best Practices for JavaScript Redirects
Getting a javascript forward url to work is one thing, but making sure it doesn't hurt your search rankings or open you up to security risks is another challenge entirely. How search engines see your redirects can make or break your SEO, and one wrong move with user-supplied URLs can put your audience at risk.
From an SEO standpoint, the big difference is between client-side redirects (like JavaScript) and server-side ones. While Google's bots have gotten pretty good at processing JavaScript, they still overwhelmingly prefer a classic server-side redirect, especially a permanent (301) one. A 301 tells search engines, "Hey, this page has moved for good," and it's the best way to pass along all that valuable link equity you've built up.
JavaScript redirects, however, often get treated like a temporary detour. That makes them great for things that happen based on a user's actions, but not so great for permanent changes where you need to preserve your SEO authority.
Keeping Your SEO Healthy
When a search engine bot hits a page with a JavaScript redirect, it has to render the entire page just to find and run the script. That extra step adds time and eats into the bot's crawl budget. A slow-loading forward is a double whammy: it annoys real users and can signal poor page performance to search engines.
Here's what I always keep in mind for SEO:
- Go Server-Side for Permanent Moves: If you're changing a URL for good—like renaming a blog category or updating a product page—a server-side 301 redirect is non-negotiable.
- Use Client-Side for User Actions: Save JavaScript forwards for dynamic scenarios where SEO isn't the main goal. Think of sending a user to their dashboard after they log in or routing them based on their location.
- Speed is Everything: If you absolutely must use a client-side redirect for an indexed page, make sure it fires off instantly. Any delay can hurt both user experience and your crawl efficiency.
If you're curious about other client-side options, you can see how a basic HTML URL redirect works and weigh its pros and cons against JavaScript.
Fortifying Against Security Threats
Beyond SEO, security is a huge deal. One of the most common and dangerous vulnerabilities with URL forwarding is the dreaded open redirect. This happens when your code accepts any URL from a user and blindly redirects to it, letting attackers use your trusted domain for their own shady purposes.
Think about it: an attacker could create a link like https://yoursite.com/redirect?url=https://malicious-site.com. Someone who trusts your brand might click it, assuming it's safe, only to land on a phishing page. That kind of mistake can instantly shatter user trust.
Protecting your users is non-negotiable. Always treat external URLs as untrusted input. Proper validation isn't just a best practice; it's a fundamental security requirement for any application that handles dynamic redirects.
To shut down open redirects, you have to validate every URL before triggering the forward. The most reliable way to do this is by creating an "allowlist" of domains you know are safe. Anything not on that list gets blocked.
Here’s a practical function for safe redirection:
function safeRedirect(url) { const allowedDomains = ['your-domain.com', 'partner-site.com']; try { const destinationUrl = new URL(url); // Check if the URL's hostname is in our safe list if (allowedDomains.includes(destinationUrl.hostname)) { window.location.href = url; } else { console.error('Redirect blocked: Untrusted domain.'); // Always have a fallback to a safe, default page window.location.href = '/error-page'; } } catch (e) { console.error('Invalid URL format.'); } }
// How to use it: safeRedirect('https://your-domain.com/profile'); // Works as expected safeRedirect('https://malicious-site.com'); // Gets blocked
By putting a strict check like this in place, you can be confident your javascript forward url is a helpful feature, not a security backdoor.
Real-World Scenarios and Troubleshooting Tips
Knowing the theory is one thing, but putting a javascript forward url to work in a real project is where the rubber meets the road. Let's dig into a couple of common situations you'll likely face and break down the issues that often pop up.
A classic example is a timed redirect. Say you've got a "Thank You" page after a form submission. You don't want to leave the user just sitting there; you want to guide them back to the homepage after a few seconds. For this, setTimeout() is your go-to function.
// Waits for 5 seconds (5000 milliseconds) then redirects the user. console.log('Returning to homepage in 5 seconds...');
setTimeout(() => { window.location.replace('/'); }, 5000);
You'll notice I'm using location.replace() here. That's intentional. It prevents the "Thank You" page from being added to the browser's history, so if the user clicks the back button, they aren't annoyingly sent right back to it. It’s a small detail that makes for a much smoother user experience.
Common Redirect Problems and Fixes
Of course, even with simple code, redirects can go sideways. The most infamous problem is the infinite redirect loop. This monster usually appears when your destination page somehow triggers the same redirect logic, sending the browser into a frantic back-and-forth until it gives up and throws an error.
Another headache is a redirect that fires too early. If your script is in the <head>, it might whisk the user away before they even see the page content. This is not only jarring for the user but can also wreck your analytics by not giving tracking scripts enough time to load.
Pro Tip: I almost always place my redirect scripts just before the closing
</body>tag. Another solid approach is to wrap the code in aDOMContentLoadedevent listener. Both methods ensure the page content is fully parsed and visible before the redirect kicks in.
Here are a few things to check when your forward isn't behaving:
- Infinite Loops: Scrutinize the logic on both the source and destination pages. The condition that triggers the redirect absolutely must be unique to the source page.
- Redirect Not Firing: Pop open your browser's developer tools and check the Console tab. A rogue JavaScript error elsewhere on the page can stop your script dead in its tracks, preventing the redirect code from ever running.
- iFrame Troubles: Be extra careful when redirecting inside an iFrame. It's easy to accidentally write code that redirects the entire parent window (
top.location) instead of just the iFrame's content.
Using Developer Tools to Debug
Your browser’s built-in developer tools are indispensable for this kind of work. The Network tab, in particular, is a lifesaver. If you see an endless, rapid-fire sequence of requests between two URLs, you've spotted an infinite loop in the wild.
For stickier problems, an online HTML viewer can be incredibly helpful. It lets you inspect the final rendered code, showing you exactly what the browser is dealing with before your scripts execute. If you need a good one, check out the online HTML viewer on HostMora's blog. Getting comfortable with these tools will help you crush just about any redirect bug that comes your way.
Got Questions About JavaScript URL Forwarding? We’ve Got Answers.
When you start working with javascript forward url methods, a few common questions always seem to pop up. Let's tackle some of the ones I hear most often from other developers to clear up any confusion and get you on the right track.
Is a JavaScript Redirect a Bad Idea for SEO?
It’s not automatically bad, but you have to know when to use it. While search engines like Google can process client-side redirects, they aren’t as efficient or powerful as a good old-fashioned server-side 301 redirect. For any permanent move, a 301 is always the best choice for passing link equity.
My rule of thumb? Use JavaScript forwards for things that happen after the user is already interacting with your site—like sending them to a dashboard after they log in or routing them based on a setting they just chose. For those cases, SEO isn't the main goal.
How Do I Redirect Someone After a Short Delay?
This is a classic. You see it all the time on "Thank You" pages after a form submission. The easiest way to create a timed redirect is with the setTimeout() function. It just tells the browser to run a piece of code after a certain number of milliseconds.
Here’s how you’d redirect a user after a 5-second pause:
setTimeout(function() { window.location.href = 'https://your-new-url.com'; }, 5000); // 5000 milliseconds = 5 seconds
It’s a simple and clean way to manage the user flow without making the page change feel too jarring.
What’s the Real Difference Between location.href and location.replace?
This is a crucial one to get right because it directly affects the user's browser history. They both send the user to a new URL, but they treat the "Back" button very differently.
location.href(and its sibling,location.assign()) acts like a normal link click. The new URL gets added to the session history, so the user can hit "Back" and land right back on your original page.location.replace()is more permanent. It completely overwrites the current page in the browser's history. This means the user cannot go back to the original page; the "Back" button will take them to the page they visited before that.
I always reach for
location.replace()after a user logs in or submits a form. It prevents them from hitting the back button and accidentally re-submitting their data, which can cause all sorts of headaches.
Can I Pass Data When I Forward a URL?
You sure can. The most straightforward way to send information from one page to another during a redirect is by tacking on query parameters to the end of the URL. This is how you often see things like user IDs or tracking codes passed around.
It's just a matter of building the URL string dynamically with your data. For instance, if you wanted to pass a user ID and their current status, it would look like this:
const userId = 451; const status = 'active';
// Build the URL with your data
window.location.href = https://example.com/dashboard?id=${userId}&status=${status};
Then, on the dashboard page, you'd use a bit of JavaScript to grab those parameters right out of the URL and put them to work.
Ready to get your own web projects online in seconds? With Hostmora, you can literally drag a file from your desktop and have a live, globally-distributed website. It gives you instant subdomains, free SSL, and incredible performance with zero configuration needed. Start building for free at Hostmora.