
Converting HTML to a JPG image is essentially about taking a high-fidelity snapshot of a web page as it's rendered in a browser. It’s a vital skill for anyone who needs to bridge the gap between dynamic web content and a static, universally shareable image format. This comes in handy for everything from creating client-friendly proofs and generating consistent social media preview cards to archiving visual records of a site.
Why Bother Converting HTML to JPG?
At first glance, this might just sound like a fancy way to take a screenshot. But in practice, its real-world applications are far more strategic. This simple conversion solves countless workflow headaches for developers, marketers, and designers every single day.
Think about this common scenario: you send a client a link to a staging site for review, only for them to see a broken layout because of a caching issue on their end or a font that didn't load. A JPG proof completely sidesteps that problem. The client sees exactly what you see, making feedback cycles cleaner, faster, and free of frustrating technical detours.
Common Use Cases for JPG Conversion
Beyond just getting client sign-offs, the need for static images from web content pops up all over the place:
- Social Media Previews: Ever wonder how links on social media get those nice preview images? Many are generated dynamically from HTML to create rich, branded Open Graph (OG) cards for every shared URL.
- Visual Archiving: You might need to capture snapshots of a website at specific points in time. This is common for legal compliance, historical records, or just documenting project milestones.
- Marketing Collateral: Need to include a high-quality image of a web-based report, a dashboard, or a new product feature in a presentation or email campaign? Converting the HTML is the most reliable way to do it.
- Automated Testing: In a modern CI/CD pipeline, developers use this for visual regression testing. They programmatically take screenshots of a new build and compare them against a baseline image to instantly catch unintended UI changes.
The concept of turning HTML into an image isn't new. It dates back to the late 1990s when designers needed a way to create static proofs for clients. But when responsive design became the norm around 2010, these tools became indispensable for capturing how a single page looked across dozens of different device breakpoints. You can read more about the evolution of web conversion tools.
Finding the Right Conversion Method
So, how do you actually do it? The best method really boils down to your technical comfort level and what you're trying to achieve. Are you doing a one-off conversion, or do you need to automate this for thousands of images?
This flowchart lays out the two main paths you can take: programmatic libraries that give you full control via code, and no-code online tools that get the job done quickly.
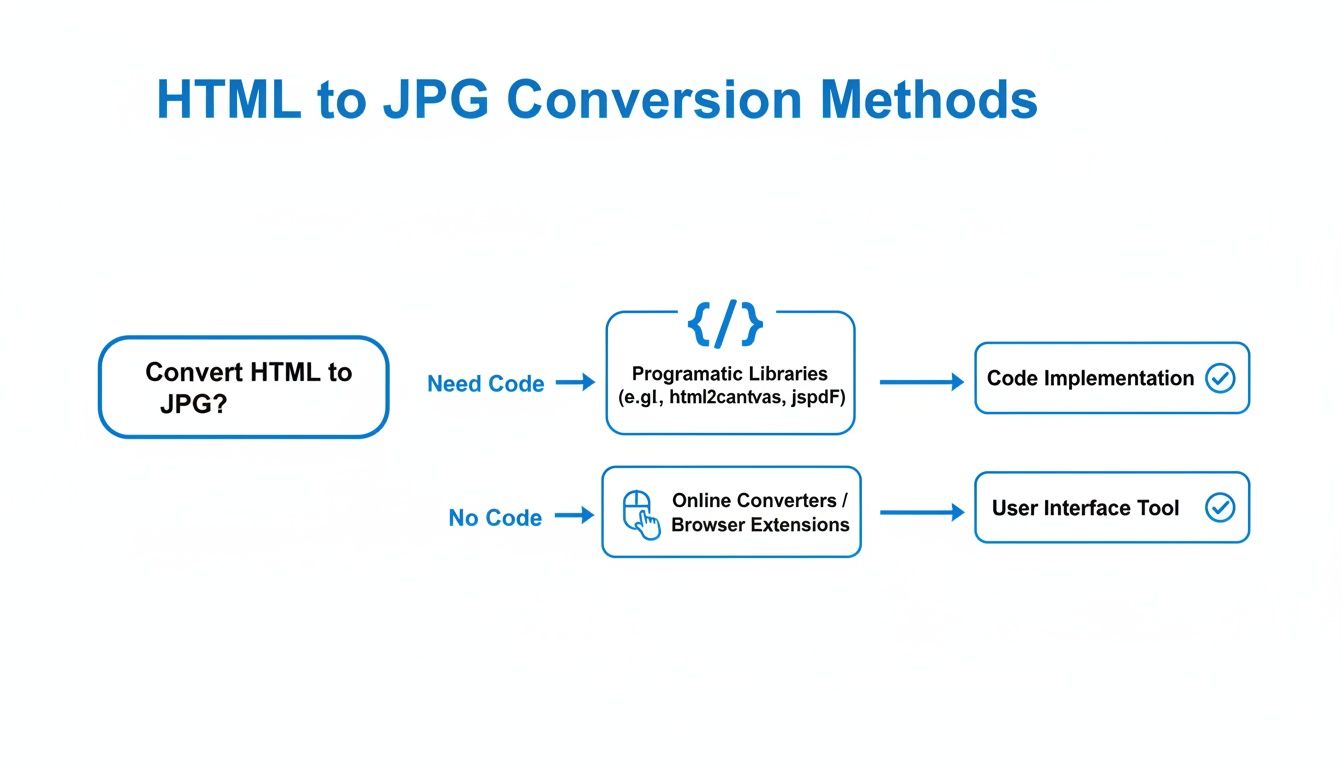
As you can see, your first big decision is whether you need the deep control and automation that comes with coding or the simple speed of a user-friendly online converter.
To make that choice even clearer, let's break down the most popular methods.
HTML to JPG Conversion Methods at a Glance
This table gives a quick comparison of the top methods for converting HTML files and URLs to JPG images, highlighting their strengths and who they're best for.
| Method | Best For | Technical Skill | Key Feature |
|---|---|---|---|
| Headless Chrome/Puppeteer | Developers needing full control, automation, and high-fidelity rendering. | High | Uses the real Chrome engine for perfect accuracy. |
| wkhtmltoimage | Server-side automation in environments where a full browser is overkill. | Medium | Lightweight and fast command-line tool. |
| Online Conversion APIs | Integrating image generation into apps without managing infrastructure. | Medium | Scalable, managed service with advanced features. |
| No-Code Online Tools | Quick, one-off conversions for non-technical users. | Low | Simple drag-and-drop or copy-paste interface. |
Each of these has its place. A developer building an automated reporting system will almost certainly reach for a programmatic tool like Puppeteer, while a project manager who just needs a quick snapshot for a presentation will be perfectly served by a simple online tool.
Gain Full Control with Headless Browsers
When you need pixel-perfect precision and a way to automate converting HTML to JPG, a headless browser is your best friend. Think of it as a full-featured browser like Chrome or Firefox, but it runs behind the scenes without any visible window. This approach gives you, the developer, complete control over every tiny detail of the screenshot, from the exact viewport size to how CSS gets rendered.
For most of us working in this space, Puppeteer is the first tool we reach for. It’s a library maintained by the Chrome DevTools team, which means it provides a clean, powerful way to control a headless version of Chrome or Chromium. The real win here is that your screenshots are rendered with the very same engine that over 65% of the world uses every day. That’s how you guarantee the final JPG looks exactly like it does in a real browser.
Getting Started with Puppeteer
Puppeteer allows you to write scripts that navigate to a URL, wait for everything to finish loading (including tricky web fonts and JavaScript), and then snap a picture. This is a massive leap forward from basic screenshot tools that often capture the page too early, leaving you with missing images or text styled in a fallback font.
You can see from a glance at the official Puppeteer documentation just how clean and modern its API is.
The code is surprisingly readable, with intuitive commands like page.goto() and page.screenshot(). This makes it a fantastic tool, even if you’re just dipping your toes into browser automation.
A simple script can do some pretty heavy lifting. Let's say you need to generate a JPG of a live sales dashboard every morning at 9 AM. A few lines of Puppeteer code, hooked up to a cron job, can automate that entire process. No more manual work, every single day.
const puppeteer = require('puppeteer');
(async () => { const browser = await puppeteer.launch(); const page = await browser.newPage(); await page.goto('https://example.com/dashboard'); await page.screenshot({ path: 'dashboard-capture.jpg', quality: 85 }); await browser.close(); })();
This little script fires up a browser, visits a page, and saves it as a JPG. Notice the quality parameter—that gives you direct control over the image's compression and file size, which is crucial if you're concerned about web performance.
Digging Deeper with Advanced Techniques
The real magic of headless browsers comes into play when you move past simple full-page captures. More often than not, you don't actually need the entire page. You might just want a specific chart, a user’s profile card, or a product image.
- Targeting Specific Elements: You can tell Puppeteer to screenshot just one part of the page by pointing it to a CSS selector. This is perfect for creating images of individual components for a style guide or for sharing on social media.
- Setting Custom Viewports: Wondering how a page renders on an iPhone 14 Pro versus a standard desktop? You can define the exact viewport dimensions and even the device pixel ratio (DPR) to get an accurate simulation of different screens.
- Handling Lazy-Loaded Content: So many modern sites wait to load images until you scroll down to them. You can program Puppeteer to scroll through the entire page first, making sure all that lazy-loaded content is visible before it takes the final screenshot.
A classic mistake I see all the time is capturing a page before custom web fonts have loaded, which leaves you with ugly fallback fonts in the final JPG. You can easily sidestep this by using
page.waitForSelector()to wait for an element that uses your custom font, or by telling Puppeteer to wait until the network is completely idle.
Don't Forget the Command-Line Alternatives
While Puppeteer is a fantastic modern solution, sometimes it's overkill. An old-school command-line tool like wkhtmltoimage is still a great option, especially for server-side tasks. It’s built on the WebKit rendering engine (the same one that powers Safari) and can be run with a single, simple command.
For instance, creating an image is as straightforward as this:
wkhtmltoimage https://hostmora.com homepage.jpg
It might struggle with complex, JavaScript-heavy single-page apps where a full Chromium instance would shine, but for static HTML or simpler sites, it’s incredibly fast and light on resources. It's a reliable workhorse that still has a place in many automated systems today.
Choosing The Right Online Tool Or API
While firing up a headless browser gives you ultimate control, it’s not always the quickest or simplest path. Sometimes, you just need a great-looking JPG without touching a line of code. That’s where online converters and specialized APIs come in. These services are built to do one thing exceptionally well: turn your HTML into a pixel-perfect image, fast.
The biggest draw here is convenience. You just hand over a URL or your HTML file, and their servers do all the heavy lifting. No software to install, no dependencies to manage. It's the perfect solution when you need a high-quality capture for a one-off project or just want to avoid the technical overhead.
Evaluating Key Features and Performance
But here’s the thing: not all online tools are created equal. A basic converter might choke on a modern, JavaScript-heavy webpage, leaving you with a broken or incomplete image. When you’re vetting a service, performance and rendering accuracy are everything.
You need a tool that can intelligently handle the complexities of the modern web. Look for services that explicitly mention support for:
- Lazy Loading: Does the tool actually wait for all the content and images "below the fold" to load before it snaps the picture? This is a common failure point.
- Complex CSS: Can it correctly render modern layouts built with Flexbox and CSS Grid without everything falling apart?
- Ad Blocking: A quality service will automatically block ads, cookie pop-ups, and other distracting overlays that can ruin your final image.
The secret is that the most reliable online converters and APIs are already running their own headless browser infrastructure in the cloud. You get the power of a real Chrome instance without having to manage a single server yourself.
Before you even think about a paid plan, always run a test. Grab a URL from a complex site you know well and see how the service handles it. This simple gut check can save you a world of frustration by revealing a tool's true rendering capabilities. If you want to double-check your code first, a good online HTML viewer is a great way to preview your work.
Comparing Popular HTML to JPG APIs
For businesses that need to generate images at scale—think automated social media cards, dynamic PDF reports, or personalized marketing visuals—a dedicated screenshot API is the only way to go. These services are built from the ground up for automation and reliability.
In the real world, this is a game-changer for high-volume tasks. We're talking about everything from generating thousands of property listings to creating custom QR menus for a restaurant chain. These APIs take an HTML file or URL and return a clean JPG, often in seconds. A typical entry-level plan might start around $9.99 per month for something like 1,500 conversion minutes, which is more than enough for a small agency to generate thousands of proofs at a predictable cost. You can get a deeper look into how these conversion tools power business workflows.
To help you navigate the options, I've put together a quick comparison of some of the leading API providers out there.
Comparing Popular HTML to JPG APIs
This table breaks down the features of a few popular screenshot APIs to help you find the right fit for your project and budget.
| API Service | Free Tier Details | Key Features | Ideal Use Case |
|---|---|---|---|
| URLbox | 7-day trial with full features | High-fidelity rendering, ad blocking, custom proxy support | Marketing agencies and SaaS companies needing top-tier accuracy. |
| ScreenshotAPI | 100 free captures/month | Simple REST API, Google Drive & S3 integration, full-page capture | Developers needing a straightforward and affordable integration. |
| ApiFlash | 500 free captures/month | CSS injection, custom viewport, response timing options | Startups and freelancers automating image creation on a budget. |
Each service has its strengths, so the "best" one really depends on what you're trying to accomplish.
Ultimately, whether you're a freelancer grabbing a quick screenshot or a large company building an automated image pipeline, there's an online html to jpg service that fits. The key is to match the tool’s capabilities with your specific project goals and technical needs.
Achieving Pixel-Perfect Image Quality
It’s one thing to generate an HTML to JPG image; it's another thing entirely to get it looking right. The biggest headache I see people run into is when the final JPG is a poor imitation of the live HTML. You get missing images, generic fallback fonts, and content that’s awkwardly cut off.
These glitches almost always come down to timing. The conversion tool is just too fast for its own good. It snaps the picture before the page has finished loading all its assets. Modern websites are built to load things asynchronously—like fonts and images—to feel snappy for us humans, but a script often captures that incomplete, in-between state.
Handling Lazy-Loaded Content
A classic example of this is lazy-loaded images. To speed up load times, many sites won't load an image until you actually scroll it into view. Since your conversion script doesn't scroll, it captures empty placeholders where your beautiful images are supposed to be.
The solution? You have to trick the page into thinking it's been fully scrolled. If you're using a tool like Puppeteer, you can write a simple script to programmatically scroll to the very bottom of the page. This action triggers all the lazy-loading mechanisms, forcing every single image to load before you take the screenshot.
Capturing the full page is non-negotiable for long-form content like an entire blog post or a detailed report. A process that only grabs the visible part of the screen is useless in these cases. For those working with other document formats, our guide on converting Markdown files to PDF shares similar tactics for ensuring you capture the whole document perfectly.
Ensuring Web Fonts Render Correctly
Web fonts are another common point of failure. The script captures the page before your custom brand font has loaded, leaving you with a generic system font like Arial. It just looks unprofessional.
The fix here is to build in a deliberate pause. Most conversion APIs and headless browser tools let you add a "wait" condition. You can tell the script to wait for a specific network event to finish, pause for a set number of seconds, or—my preferred method—wait until a specific CSS element that uses your custom font is visible. That small delay is usually all the browser needs to fetch and apply the correct typography.
This is where web design and content distribution really meet. The JPEG format is a fantastic choice because of its universal compatibility; it's supported by every major browser and can handle massive dimensions up to 65,535 × 65,535 pixels. The real art is balancing quality with file size. Most of the time, you're aiming for a final image under 200–400 KB to keep things fast while delivering a crisp, on-brand visual. You can dig into more current web design trends in this market report to see how visuals play a role.
How to Put Your Conversion Workflow on Autopilot
Manually converting HTML to a JPG is fine for a one-off task, but the real magic happens when you make the whole process run itself. Automation transforms this simple utility into a powerful, scalable system that works for you in the background. Whether you're deep in code or managing business operations, you can build a workflow that generates images without any manual intervention.
For developers, the biggest win comes from integrating this process into a CI/CD pipeline. Picture this: every time you push a code update, a script automatically spins up and takes snapshots of your key UI components. This is the heart of visual regression testing, and it lets you spot unintended visual bugs instantly—long before they ever make it to your users.
Automating with GitHub Actions
Getting a screenshot script running with GitHub Actions is a lot more straightforward than you might think. You can use a headless browser tool like Puppeteer or Playwright to run a script that captures your web pages right after your app is built and deployed to a staging server.
A basic GitHub Actions workflow file would look something like this:
- Checkout Code: It starts by pulling the latest version of your repository.
- Setup Environment: Next, it installs Node.js and any dependencies your script needs, like Puppeteer itself.
- Run Build Process: This is where you run your standard build command, like
npm run build. - Execute Screenshot Script: Finally, your script runs, captures the pages you've defined, and saves the images as artifacts.
With a setup like this, you get a consistent visual record of your application's state with every single commit.
The core idea here is to shift from reactive to proactive quality control. Instead of waiting for a user to report a broken layout, you catch the visual bug automatically the moment the code is committed. This approach saves countless hours in debugging and protects your brand's consistency.
No-Code Automation for Everyone
But automation isn't just for developers. Using platforms like Zapier or Make.com, anyone can hook up an HTML-to-JPG API to their favorite apps without writing a single line of code. These tools are the glue between different web services, letting you create incredibly powerful workflows.
Just think about the possibilities. You could build an automation (a "Zap" or a "Scenario") that watches a specific folder in Google Drive. Whenever a new HTML file appears in that folder, it instantly triggers an API call to a screenshot service. The resulting JPG could then be saved to a different folder in Dropbox or even posted directly to your team's Slack channel.
This kind of hands-off system is a game-changer for marketing teams generating social media assets or agencies creating client proofs. You just supply the input—the HTML file—and your automated workflow handles the entire conversion and delivery process from start to finish.
Common Questions About Converting HTML to JPG
Once you start digging into HTML to JPG conversions, a few questions always pop up. Let's walk through the most common ones I've encountered to clear up any confusion and get you ready for any real-world scenario.
One of the first things developers weigh is performance. For a one-off conversion, running a local headless browser script is almost always faster because you skip the network round-trip. But when you need to handle serious volume, APIs are built for that. They can manage hundreds of concurrent requests, giving you scalability that’s hard to match on your own.
How Do I Capture Interactive Elements?
This is a big one. What happens when you need to screenshot a chart that only appears after a button click, or capture a tooltip that shows on hover?
This is where programmatic tools like Puppeteer are invaluable. You’re not just taking a static picture; you’re scripting a user’s actions before the screenshot happens.
- Clicking Elements: You can tell your script to find a specific button or link and click it to reveal more content.
- Form Fills: Need to capture a results page? Just automate filling in the form fields first.
- Triggering Hovers: You can even simulate a mouse hover to capture dynamic CSS states, like dropdown menus or highlighted elements.
Simple online converters can't do this. They just see the page as it first loads.
The real difference is control. With a script, you direct the browser's every action, getting the page into the exact state you need. An API offers convenience but far less influence over these dynamic moments.
What If I Need a Different Image Format?
While JPG is perfect for photos and general web use thanks to its great compression, it's not always the best choice.
PNG is a fantastic alternative if you need a transparent background or want to preserve the sharp, crisp edges of text and UI elements without any compression artifacts. The good news is that most headless browsers and conversion APIs let you define the output format. Often, it's as simple as changing your output file from capture.jpg to capture.png.
The rendering principles we’ve talked about apply to other formats, too. For example, if your goal is generating documents, the challenges are very similar. Our guide on creating a PDF from a website dives into many of the same rendering issues.
In the end, the right tool and format always come down to your specific project needs—whether you prioritize quality, speed, file size, or automation.
Ready to publish your HTML projects without the fuss? With Hostmora, you can drag and drop your files and get a live, secure link in seconds on a global edge network. Get started for free at https://hostmora.com.