
If you’re looking for a fast, secure, and surprisingly simple way to get your website live, Firebase Hosting should be on your radar. It’s built to host modern web apps—from simple static landing pages to complex single-page applications—without the headache of managing servers. It comes packed with a global CDN, free automatic SSL certificates, and deep integration into the Google Cloud ecosystem.
Why Smart Developers Choose Firebase Hosting
Before we dive into the firebase deploy command, let's talk about why so many developers swear by Firebase Hosting. The platform essentially eliminates the classic pain points of web deployment. Gone are the days of wrestling with FTP clients, SSHing into a server to tweak configs, or panicking when your SSL certificate is about to expire. Firebase just handles it.
This means you get to spend more time building cool stuff and less time fighting with infrastructure. Think about it: a freelancer can push a client's new marketing site live in minutes, not hours. A startup can launch its MVP without hiring a dedicated DevOps person right out of the gate. That’s the real-world impact.
To give you a clearer picture, here's a quick rundown of what makes it stand out.
Firebase Hosting Features at a Glance
| Feature | Benefit for Developers & Agencies |
|---|---|
| Global CDN | Your site loads blazingly fast for users anywhere in the world, which is great for SEO and user experience. |
| Free, Auto-Renewing SSL | Every site gets HTTPS encryption out of the box. No manual setup or renewal fees, ever. |
| One-Command Deploys | Push your entire site live with a single command, making updates quick and painless. |
| Atomic Deploys & Rollbacks | New versions are deployed instantly, and you can roll back to a previous version with one click. No downtime. |
| Custom Domain Support | Easily connect your own domain name (e.g., your-brand.com) at no extra cost. |
| Integration with Cloud Functions | Add dynamic, server-side functionality to your static site without managing a separate backend. |
| Generous Free Tier | The "Spark Plan" is more than enough for personal projects, prototypes, and many small business sites. |
Ultimately, Firebase Hosting makes shipping projects simpler and more reliable.
Speed and Security Built-In
Performance is at the heart of Firebase Hosting. The moment you deploy, your assets get cached across Google's global CDN. This means a user in Tokyo gets the same snappy experience as someone in New York. A fast site isn't just a nice-to-have; it directly impacts user retention and how well you rank on Google.
Security is just as critical. Firebase automatically provisions and renews a free SSL certificate for any custom domain you connect. That little green padlock in the browser bar is non-negotiable for building trust and is now a firm requirement for modern SEO. Having it handled automatically saves a surprising amount of time and money.
The real value of Firebase Hosting is its ability to abstract away infrastructure complexity. It lets you ship projects faster and with more confidence, knowing that Google's powerful network is handling the delivery and security for you.
Since it first appeared in 2014, Firebase has become a major player. By 2024, it had captured a 2.14% market share in the application development space, holding its own against heavyweights like AWS. While the free plan is fantastic, it's always smart to check out all the options for free static site hosting to see what best fits your needs. For many, though, the blend of speed, security, and a robust free tier makes it a no-brainer. For a deeper look at the market, you can find recent analysis of cloud development platforms.
Going Live: Your First Firebase Deployment
Alright, this is the exciting part. You've built your site—maybe a slick portfolio with some HTML and CSS, or a single-page app—and now it's time to get it off your local machine and onto the web for everyone to see. With Firebase, this whole process is refreshingly simple and revolves around just a few commands in your terminal.
First things first, you need the Firebase Command Line Interface (CLI). Think of the CLI as your direct line to Google's cloud infrastructure. If you have Node.js and npm installed, you can grab it with a single command. Once that's done, you'll log in to your Google account to authorize the CLI to work with your projects.
The entire workflow is beautifully straightforward, as this diagram shows.
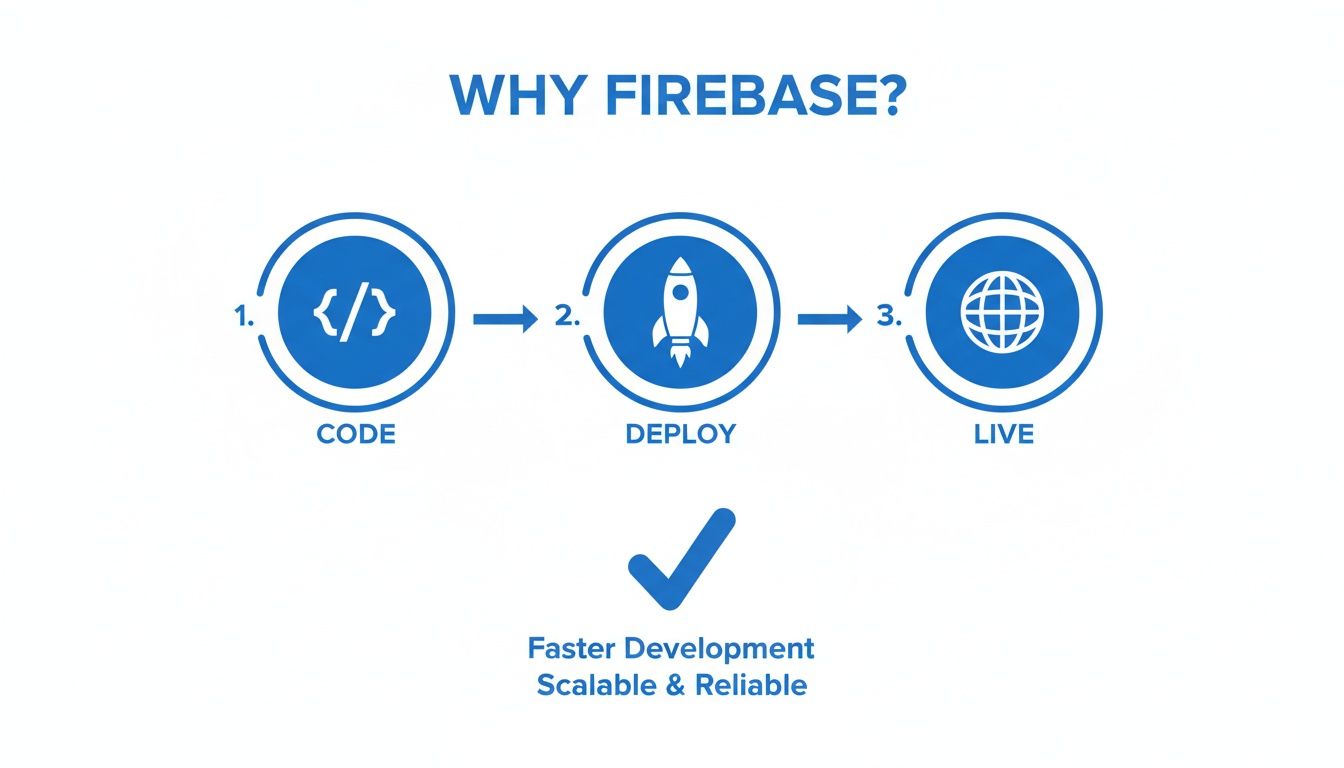
You code your app, run one command to deploy, and it's instantly live on a global network. That's really all there is to it.
Initializing Your Project
With the CLI installed and ready to go, pop open your terminal and navigate to your project's root folder. This is where you'll kick things off by running firebase init. This command starts an interactive setup guide that links your local directory to a specific project on Firebase.
The CLI will walk you through a few questions to build out your configuration. Here’s a quick rundown of what it will ask and what you should choose:
- Which Firebase features do you want to set up? Navigate down to Hosting, hit the spacebar to select it, and then press Enter.
- Please select an option: You can either connect to a Firebase project you’ve already created in the console or make a new one right here from the command line.
- What do you want to use as your public directory? This one is key. It's the folder that holds all the files you want to make public, like your
index.html. If you're building a static site, it might be namedpublic. For projects with a build step (like React or Vue), it’s oftendistorbuild. - Configure as a single-page app (rewrite all urls to /index.html)? If you've built a single-page application (SPA) that uses client-side routing, say yes (y). This tells Firebase to send all requests to
index.htmlso your app can handle the routing. For a traditional multi-page site, no (n) is the way to go.
After you're done, you'll spot two new files in your project: .firebaserc (which connects the folder to your project ID) and firebase.json (where all your hosting settings live).
Don't stress too much about getting the
firebase.jsonperfect on the first try. It’s just a starting point. You can easily tweak it later to add powerful features like redirects, custom headers, or even serverless functions.
The Final Push
Your project is now fully configured and prepped for launch. The last step is the most satisfying one. Just run this command:
firebase deploy
The CLI takes over from here. It bundles up everything in your public directory, uploads it to Firebase, and distributes it across a global Content Delivery Network (CDN). The whole thing usually takes just a few seconds.
Once it's finished, the terminal will give you your live URLs—one ending in web.app and a legacy one on firebaseapp.com.
And just like that, your website is live! You can send that URL to anyone, anywhere, and they’ll see your project served lightning-fast over a secure HTTPS connection. This simple, one-command deployment is exactly what makes Firebase website hosting such a go-to choice for developers.
Connecting a Custom Domain and Getting That Green Lock
The default .firebaseapp.com URL is great for staging and quick tests, but when you're ready to go live, you need a custom domain. This is where your project sheds its development skin and becomes a professional, branded website.
Thankfully, Firebase makes this transition almost painless. You basically just tell Firebase your domain name and then prove you own it by tweaking a setting at your domain registrar (like GoDaddy or Namecheap).

Domain Verification in Minutes
First, jump into your Firebase console, find the Hosting section, and click “Add custom domain.” Pop your domain in there, and Firebase will hand you a TXT record. Think of this as a unique code.
Your job is to add this TXT record to your domain's DNS settings. This is a standard security check—it’s how you prove to Firebase that you actually own the domain you’re trying to connect.
To get this done, you'll need to:
- Log into your domain registrar’s dashboard.
- Find the DNS management or editor section for your domain.
- Create a new TXT record and paste in the value Firebase gave you.
DNS changes can sometimes take a while to "propagate" across the internet, but I’ve found that Firebase usually spots the change in less than 30 minutes. If you're new to DNS, our guide on how to show DNS records for a domain can help you get your bearings.
The Magic of Automatic SSL
Once Firebase confirms your domain, the real magic happens. Firebase website hosting automatically provisions and installs a free SSL certificate for you. This is what enables HTTPS and puts that reassuring little padlock icon in your users' browser bar.
The real game-changer here isn't just that the SSL certificate is free, but that it's also automatically renewed. You never have to worry about an expired certificate taking your site offline, a common and stressful issue with other hosting solutions.
This one feature is a massive time-saver. No more dealing with third-party certificate authorities or setting calendar reminders to renew. Google knows that a secure web is non-negotiable; browsers flag non-HTTPS sites, and users are wary of them. By building this right into the hosting service, Firebase makes every site secure by default. It's a huge win for both security and your sanity.
Fine-Tuning Your Site with firebase.json
Once you get your site deployed, the real magic starts happening inside the firebase.json file. Think of this as the control panel for your entire hosting setup. It's where you go beyond the basic deployment to implement powerful rules that can seriously level up your site's SEO, user experience, and overall functionality. This is how you make your hosting truly work for you.
A lot of us gravitate towards Firebase because it just makes things easy. In a world of complex cloud platforms, its straightforward, developer-first approach is a breath of fresh air. It’s no surprise that projections show Firebase Hosting holding a 3.0% market share in key cloud segments, especially for developers who just want to get a web project live without a ton of ceremony. This simplicity is perfectly captured in firebase.json, where you can manage some pretty complex behaviors with just a few lines of configuration. If you're curious about the bigger picture, it's always interesting to look into comparisons of major cloud platforms.
Getting Single-Page App Routing Right with Rewrites
One of the first things you'll bump into when deploying a single-page app (SPA) is routing. If you're using a framework like React, Vue, or Angular, your app handles all the routing on the client-side. Someone might go to your-cool-app.com/profile, but there’s no profile.html file sitting on your server.
So what happens when a user bookmarks that URL and comes back later, or just hits refresh? Firebase Hosting looks for /profile, doesn't find a file, and throws a 404 error. Not a great experience.
This is where rewrites come in. You can add a simple rule to firebase.json that basically says, "Hey, if you can't find a specific file for a requested URL, just send back index.html instead." Your SPA then loads up, the router kicks in, and it displays the correct page. It's a clean and elegant solution.
Here's the snippet you'll almost always need for an SPA: { "hosting": { "public": "build", "rewrites": [ { "source": "**", "destination": "/index.html" } ] } } This little block of JSON is the cornerstone of hosting any modern JavaScript application on Firebase.
Managing Redirects and Creating Clean URLs
The firebase.json file is also your go-to for wrangling your site's URLs, which is crucial for good SEO and a professional feel.
- Permanent Redirects (301): Did you move a page from
/old-pathto/new-path? A 301 redirect tells search engines and browsers that the page has moved for good, passing along any SEO juice to the new location. - Clean URLs: Let's be honest,
your-site.com/about.htmljust looks dated. You can instantly modernize your links by telling Firebase to automatically handle URLs without the.htmlextension.
For instance, if you wanted to redirect an old article and turn on clean URLs, your configuration would look something like this: { "hosting": { "public": "public", "cleanUrls": true, "redirects": [ { "source": "/old-blog-post", "destination": "/new-blog-post", "type": 301 } ] } }
Pro Tip: Always use a 301 redirect for content that has permanently moved. This is a non-negotiable step if you care about maintaining your search rankings after reorganizing your site.
With these simple, declarative rules, you can solve common hosting headaches and gain precise control over how people—and search engine bots—navigate your site.
Automating Deployments with a CI/CD Pipeline
Let's be honest, manually running firebase deploy gets old, fast. It’s fine when you're just starting out, but as soon as you get into a rhythm of fixing bugs and shipping features, it becomes a tedious, error-prone chore. Did you remember to build the latest changes? Did you push them live? This is exactly the problem CI/CD (Continuous Integration/Continuous Deployment) was born to solve.
A CI/CD pipeline takes that entire manual process off your plate. The idea is wonderfully simple: every time you merge new code into your main branch, an automated workflow kicks in, builds your project, and deploys it straight to Firebase Hosting. It’s a completely hands-off approach that not only saves a ton of time but also eliminates the risk of human error, ensuring your live site always reflects your latest stable code.

Setting Up a Workflow with GitHub Actions
GitHub Actions is my go-to for this because it's built right into your repository and is incredibly powerful. You just need to create a simple YAML file that lays out the steps for GitHub's runner to follow—checking out the code, installing dependencies, and finally, deploying.
To get this pipeline running, you’ll need two things:
- A Workflow File: This is a
.ymlfile you'll create inside a.github/workflows/directory in your project. It's the blueprint for your automation. - A Secure Token: You need a way for GitHub to authenticate with Firebase on your behalf without you having to paste your private credentials into your code. Never do that!
The secret sauce here is, well, a "secret." You'll use the Firebase CLI to generate a special deployment token and then save it as a secret in your GitHub repository's settings. This makes the token securely available to your workflow during its run.
A Practical GitHub Actions Example
Here’s a complete workflow file that you can copy and adapt. I've written this assuming you're working with a typical JavaScript project that has a build step (like React, Vue, or Svelte).
name: Deploy to Firebase Hosting
on: push: branches: - main # Or 'master', depending on your branch name
jobs:
build_and_deploy:
runs-on: ubuntu-latest
steps:
- uses: actions/checkout@v3
- name: Install Dependencies
run: npm ci
- name: Build Project
run: npm run build
- name: Deploy to Firebase
uses: FirebaseExtended/action-hosting-deploy@v0
with:
repoToken: '${{ secrets.GITHUB_TOKEN }}'
firebaseServiceAccount: '${{ secrets.FIREBASE_SERVICE_ACCOUNT_YOUR_PROJECT_ID }}'
channelId: live
projectId: your-project-id
This script triggers automatically on every push to the main branch. It pulls down the code, runs npm ci (which is faster and more reliable for CI environments than npm install), and then executes your project's build command. A common tripwire in CI setups is an environment mismatch; for instance, if you're using a specific Node.js version, you might need a Node.js version check step to avoid unexpected build failures.
Automation creates a reliable and repeatable deployment process. This frees you up to focus on what actually matters—building great features for your users—instead of getting bogged down in the mechanics of pushing code to production.
Finally, the FirebaseExtended/action-hosting-deploy@v0 action does the heavy lifting, using the secret you stored earlier to deploy to your live channel. With this simple file, you've transformed your Firebase website hosting workflow from a manual chore into a seamless, automated part of your development process.
Navigating Common Firebase Hosting Headaches
Even a smooth platform like Firebase can throw you a curveball. Getting your project deployed is one thing, but making sure it runs perfectly once it's live is a whole different ballgame. Let's walk through some of the most common snags you might hit with Firebase Hosting and how to fix them.
The Infamous SPA 404 Error
One of the first hurdles many developers encounter, especially with single-page applications, is the classic 404 error. Your React or Vue app loads beautifully on the homepage, but the moment you refresh on a nested route like /dashboard, you're hit with a "Not Found" page.
This isn't a bug; it's a misunderstanding. Firebase is looking for a physical file at that exact path (/dashboard/index.html), which doesn't exist. All the routing logic is handled client-side by your app.
The fix is a simple but critical tweak inside your firebase.json file. You just need to add a rewrite rule. This tells Firebase, "Hey, for any URL that doesn't match an actual file, just serve up index.html instead." Your SPA will then load, its internal router will kick in, and the correct page will appear.
Custom Domain Purgatory
Another frequent pain point is a custom domain that's stuck in "Needs setup" or "Pending verification." If you've given it a good hour and nothing's changed, it's time to investigate.
First, go back to your domain registrar and triple-check the TXT record you added. It needs to be an exact match for the value Firebase gave you. It's shockingly easy to have a typo or an extra space sneak in there. Also, make sure you don't have old, conflicting A records from a previous host still hanging around.
DNS changes aren't always immediate. While Firebase usually picks them up quickly, global DNS propagation can sometimes take a while. A little patience can be the final step in your debugging process.
Decoding Deploy Errors and Cache Confusion
Sometimes, the deployment itself is the problem. If firebase deploy fails, don't just run it again—read the terminal output closely. The error message is your best friend and will often point directly to the issue, whether it's a JSON syntax error or a permissions problem.
If you see a "permission denied" error, make sure the Google account you're logged into with the Firebase CLI has the right permissions (like the Firebase Hosting Admin role) for that specific project.
Caching can also make you feel like you're going crazy. You push a new update, but your browser keeps showing the old version. This is usually just the browser cache or Firebase's own CDN cache doing its job a little too well. A quick hard refresh (Ctrl+Shift+R on Windows/Linux or Cmd+Shift+R on Mac) will typically force the new content to load.
Firebase Hosting’s powerful features and generous free tier have made it a popular choice, contributing to Google's 4.5% web hosting share in a rapidly growing market. You can dive deeper into these trends and discover more web hosting statistics on Wix.com.
At Hostmora, we think publishing your site should be even easier. Just drag, drop, and your site is live on a global CDN with a secure link. No command line, no config files. Turn your files into a website in seconds with Hostmora.