

At its core, an HTML file upload is how we get files from a user's computer onto a web server. The classic way to do this is with the <input type="file"> element nestled inside an HTML <form>, which gives users a familiar button to browse and select files from their device.
Why Handling HTML File Uploads Matters
File uploads are everywhere. They’re the engine behind so much of what makes the web interactive—think about submitting a resume, sharing photos on Instagram, or attaching a document to an email. Without this simple function, the internet would be a much more static, one-way street. Nailing file uploads is a foundational skill for any web developer, unlocking the ability to build truly useful and engaging applications.
This guide will walk you through the practical steps, from the old-school methods to modern, slick interfaces. We'll skip the dense theory and get straight to what works.
Here’s what we’ll cover:
- The Foundational Method: We'll start with the tried-and-true
<input type='file'>in a basic HTML form. It's the bedrock of all file uploads. - Modern JavaScript APIs: Then, we'll level up with asynchronous uploads, drag-and-drop zones, and instant image previews for a much better user experience.
- Crucial Security Practices: You'll learn why server-side validation is non-negotiable for protecting your application, not just how to implement it.
- No-Code Publishing: We’ll even look at how platforms like Hostmora can take care of all the backend headaches, letting you publish files as secure links in seconds.
The sheer volume of traffic to dedicated upload tools shows just how critical this feature is. The popular service file-upload.org saw an incredible 7.66 million visits in May 2025 alone. With users spending over 10 minutes on the site per session, it’s obvious that people depend on solid file transfer solutions. You can dive deeper into these file upload trends in a complete analysis.
Mastering both the traditional and modern approaches to file uploads gives you the versatility to build anything from a simple contact form to a sophisticated, real-time content platform. This guide is your roadmap to getting it done right.
Building Your First HTML Form Upload
Let's start with the classic, old-school way of handling file uploads: a standard HTML <form>. Before we dive into fancy JavaScript techniques, it's crucial to understand this foundation. It’s the bedrock of how files have been sent over the web for decades—simple, reliable, and it just works everywhere.

The whole process revolves around the <form> element, which wraps our inputs and tells the browser how and where to send the file. The real hero inside this form, though, is the <input type="file"> element.
The Three Essential Form Attributes
For a file upload to actually work, your <form> tag needs three specific attributes. If you miss even one of them, the upload will silently fail, leaving you scratching your head wondering why the server isn't seeing your file. Think of these as the non-negotiables.
action: This points to the server-side URL that’s waiting to catch the file. It could be something likeaction="/upload-handler".method="POST": This tells the browser to send the form data, including the file, in the body of the request. You absolutely have to usePOST.GETrequests are meant for fetching data and have strict size limits, making them completely unsuitable for shipping files.enctype="multipart/form-data": This is the secret sauce. This attribute tells the browser to chop the request into multiple parts, so the binary file data can travel alongside any other text fields in your form. Without this, the server just gets the filename as plain text, not the file itself.
A very common rookie mistake is forgetting
enctype="multipart/form-data". The form submits, everything looks fine on the front end, but your backend code throws an error because it never received the file content. I’ve seen this trip up even seasoned developers, so always double-check it.
Here’s what a complete, functional upload form looks like in its simplest form:
Improving the User Experience
That basic form works, but we can make it a lot friendlier with just a couple of extra attributes on the <input> tag.
Want to let people upload a whole batch of photos at once? Just add the multiple attribute. It’s a simple one-word addition that transforms your uploader into a bulk-handling tool.
You can also guide users toward picking the right kind of file by using the accept attribute. For example, setting accept="image/png, image/jpeg" will tell the browser's file dialog to filter for just those image types. It’s a nice touch for the user, but remember—this is not a security measure. A savvy user can easily bypass it, so your server absolutely must validate the file type regardless.
Creating Dynamic Uploads with JavaScript
Let's be honest: traditional HTML forms get the job done, but they feel like a relic from a different era. Forcing a full page refresh just to upload a file completely breaks the user's flow. This is where JavaScript comes in, turning a clunky, static process into a smooth, dynamic experience. By tapping into the browser's powerful File API, we can work with files directly on the client's machine before they ever hit our server.

Suddenly, a world of possibilities opens up. We can generate instant image previews, validate file sizes without a slow server round-trip, or even build slick drag-and-drop interfaces that feel incredibly intuitive and fast.
Accessing File Data on the Client Side
The first step is to listen for the moment a user actually selects a file. Instead of waiting for them to click a "submit" button, we can use a JavaScript event listener right on the file input element itself. The change event fires as soon as they've made their choice.
When that event fires, the files are ready for us in the input's files property. This property holds a FileList object, which works a lot like an array and gives us all the metadata we need for each selected file. From here, you can grab crucial details:
file.name: The original filename, likemy-vacation-photo.jpg.file.size: The file's size in bytes—perfect for client-side checks.file.type: The MIME type, such asimage/jpegorapplication/pdf.
Having this info on the client side is a total game-changer. Think about it: a user accidentally tries to upload a massive 100MB video file when your limit is 10MB. With JavaScript, you can catch that mistake instantly and show a friendly error message, sparing them the frustration of a long, failed upload.
Building an Instant Image Preview
One of the best user experience upgrades you can make is an instant image preview. It provides immediate visual feedback, reassuring the user that they've picked the right file. We can pull this off with the FileReader API.
The FileReader lets you asynchronously read the contents of a file on the user's computer. To create a preview, we use its readAsDataURL() method, which cleverly converts the image into a Base64-encoded string. This string can then be dropped directly into the src attribute of an <img> tag on your page.
It looks something like this:
const fileInput = document.getElementById('image-upload'); const previewImage = document.getElementById('image-preview');
fileInput.addEventListener('change', (event) => { const file = event.target.files[0]; if (file) { const reader = new FileReader(); reader.onload = (e) => { previewImage.src = e.target.result; previewImage.style.display = 'block'; }; reader.readAsDataURL(file); } });
This simple script gives your uploader a professional and responsive feel. For a deeper dive, you can explore more in our guide to handling asynchronous file uploads.
Asynchronous Uploads with Fetch
To finally kill the page refresh, we can send the file to the server in the background using the fetch() API. This is the cornerstone of modern file uploading. We simply wrap our file data in a FormData object, which formats everything correctly for a multipart/form-data submission, just like a classic form would.
By handling the file upload in the background with
fetch(), the user can continue interacting with your webpage. You can display a progress bar, show a loading spinner, and then update the UI with a success message—all without a single page reload.
This slick approach is made possible by the powerful capabilities of modern web standards. HTML5, which introduced the amazing File API, now underpins over 90% of websites globally. This widespread adoption means developers can confidently build seamless upload experiences, from drag-and-drop to JavaScript-powered previews, without relying on clunky, outdated plugins. You can see more stats on the universal adoption of HTML5 for web development. This shift has been fundamental in creating the rich, interactive web we all use today.
Essential Security and Validation: Your First Line of Defense
Letting users upload files is incredibly useful, but it can also swing open a massive door for security threats if you're not careful. An unsecured file upload in HTML form isn't a small bug; it's a gaping vulnerability that can put your entire application at risk. This is why security and validation aren't just features—they're absolute necessities.
Your first line of defense starts on the client side. With a little JavaScript, you can check for basic things like file size and type right in the user's browser. This gives them instant feedback, like a message saying their file is too big before they spend five minutes watching an upload bar go nowhere. It’s a simple way to improve the user experience and weed out honest mistakes.
But here’s the most important thing to remember: never, ever trust the client. Client-side checks are a convenience, not a security measure. Anyone with a bit of technical know-how can easily bypass them using browser developer tools. The real security work has to happen on your server.
Fortifying Your Server
Once a file lands on your server, you're in control. This is where you lay down the law and enforce the rules that protect your system. Think of your server-side script as a hardened, skeptical gatekeeper that inspects every single file trying to get past.
A solid server-side validation process should always perform these checks:
Verify the File Type: Don't just look at the file extension. A malicious actor can easily rename
virus.exetocute-cat.jpg. Instead, you need to inspect the file's MIME type on the server to confirm its true identity.Enforce Size Limits: Your server must have a hard limit on file size and reject anything that goes over. This one simple rule can stop denial-of-service (DoS) attacks dead in their tracks, preventing someone from flooding your server with huge files to eat up all your disk space.
Sanitize the Filename: User-submitted filenames can be a minefield of weird characters and path traversal attempts (like
../../). Your best bet is to strip out anything that isn't a letter or number and generate a new, unique, and completely safe filename before saving it.Scan for Malware: If you're building a high-stakes application, running every upload through an antivirus or malware scanner is non-negotiable. This is especially critical if other users will ever see or download these files.
A classic attack involves uploading a web shell—a malicious script disguised as an image file. If successful, it can give an attacker complete control over your server. The only way to stop this is with rigorous server-side validation that checks the actual file content, not just what it claims to be.
When you're thinking about security, it's always a good idea to keep the OWASP Top 10 in mind. This list highlights the biggest security risks for web applications, and unrestricted file uploads are a frequent flyer on that list. It really drives home why these server-side checks are so important.
The right mindset is to treat every single uploaded file as hostile until you've proven it's safe. By combining user-friendly client-side hints with a strict, multi-layered validation process on the server, you can build an upload feature that's both powerful and secure.
Understanding How Servers Handle Uploads
When a user hits "upload," it might seem like magic, but there's a precise journey that file takes from their browser to your server. Even if you're a frontend developer, getting a handle on the backend process gives you the full picture.
First, the server gets the request, which is packaged up as multipart/form-data. This is just a special encoding that lets binary file data travel alongside any other text from the form. The server’s first job is to unpack this request, pulling the file data out from the rest.
Most modern web servers don't just dump the file into its final home right away. Instead, they stash it in a temporary directory. This is a smart move for both security and performance, as it lets the server inspect the file without cluttering up your main storage or putting the system at risk.
The Server-Side Validation Process
With the file safely isolated in a temporary spot, the real work begins. This is where the server becomes the ultimate gatekeeper, running checks that a user can't fake on their end.
Here’s what that typically looks like:
- Verifying MIME Type: The server looks at the file's actual content to make sure it is what it claims to be. It won't just trust a
.jpgextension; it verifies that it’s truly an image file. - Checking File Size: It enforces your predefined size limits, rejecting anything too large on the spot. This is critical for protecting server resources from being overwhelmed.
- Sanitizing the Filename: The server generates a new, safe filename to sidestep security risks like directory traversal attacks, where a malicious user could try to navigate your server’s file system.
Only after a file passes all these tests does the server move it from the temporary folder to its permanent home, whether that's an uploads directory or a cloud storage bucket.
This infographic provides a great visual breakdown of the whole flow, from the initial client-side check to the final, secure storage.
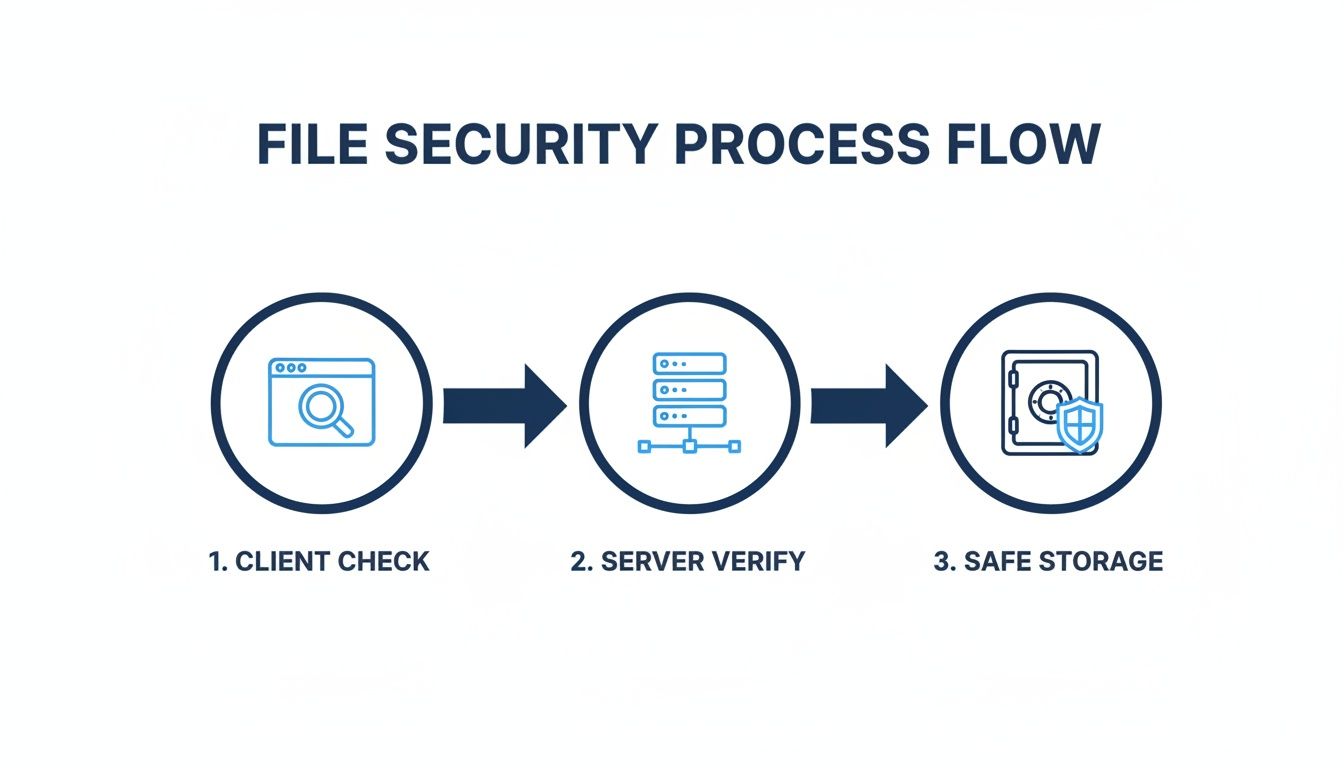
It really drives home the point that while browser-side checks are a nice-to-have for user experience, the server’s verification is the only line of defense you can truly count on.
Considering HTML is the backbone of over 95% of websites for 5.18 billion internet users, the <input type="file"> element is doing a lot of heavy lifting. In fact, it enables uploads in an estimated 71% of web applications. You can explore more about current website statistics and trends. That massive scale is precisely why rock-solid server-side processing is non-negotiable.
And if you're dealing with cloud-based infrastructure, our guide on Firebase website hosting has some related tips on managing your assets effectively.
The No-Code Shortcut for Instant Publishing
Alright, we've walked through the nitty-gritty of building a secure file upload in HTML from scratch. But what if you just need to get a file online, right now, without spinning up a server or wrestling with backend code?
Sometimes, the goal isn't the journey; it's just getting your file live. For that, a no-code approach is your best friend. It completely sidesteps the server setup, security hardening, and all the other complexities we just covered.

This is where platforms like Hostmora come in. You can literally just drag and drop a file—whether it's an HTML prototype, a PDF, or a ZIP archive—and it spits out a secure, shareable link. Done. It's the fastest way to get your work out there, period. If you're curious, you can see how we help people build websites without coding using this same philosophy.
The real beauty of this method is what you get automatically: SSL encryption, a global CDN for fast delivery, and even password protection. You get all the perks of a professional setup without touching a single line of server-side code.
If you're looking for a more form-centric solution without the coding headache, checking out an ultimate guide to finding the best form builder can point you toward some great tools that handle all the heavy lifting for you.
Frequently Asked Questions
As you get your hands dirty with file uploads, you’ll inevitably run into a few common gotchas. It happens to everyone. Let's walk through some of the questions that pop up most often, because getting these right is key to building a form that’s both functional and secure.
How Can I Limit the Size of a File Upload in HTML?
This is a big one. You might be tempted to handle file size limits purely on the client side with JavaScript by checking the file.size property. While that’s great for giving users instant feedback, it's not a security measure.
Anyone with a little technical know-how can easily bypass client-side checks. The only place to truly enforce a size limit is on your server. Your backend code must check the size of every incoming file and reject anything that's too big. This is a non-negotiable step to prevent someone from overwhelming your server with massive files.
What Is the Purpose of `enctype='multipart/form-data'`?
When you submit a regular form, the browser encodes all the data into a string. That works perfectly for text, but it completely breaks when you try to send a file, which is binary data.
Setting enctype='multipart/form-data' on your <form> element changes how the browser sends the data. Instead of encoding it, it breaks the form's payload into multiple parts, allowing the raw file data to travel alongside the other form fields.
Bottom line: If you forget to add
enctype='multipart/form-data', your server will only get the filename as a bit of text, not the actual file itself. It’s an absolutely essential attribute for any form that handles file uploads.
Can I Style the HTML File Input Button?
Ah, the classic question. Trying to directly style the <input type='file'> button with CSS is a frustrating exercise in futility. Browser support is all over the place, and you have very little control.
The standard, modern workaround is a clever bit of CSS trickery:
- You visually hide the default file input element.
- You create a nicely styled
<label>that looks like a button. - You connect the two by matching the label's
forattribute with the input'sid.
When a user clicks your custom-styled label, it triggers the hidden file input, opening the file selection dialog. This gives you complete creative control over the button's appearance without sacrificing functionality.
Ready to skip the server setup and publish files instantly? With Hostmora, you can drag and drop any file to get a secure, shareable link in seconds. Try it for free at https://hostmora.com and go from file to live URL without the hassle.